Newsletter #3: Evaluating Concealed Carry Options, Part 2

Issue #3, December 31, 2009

The Tactical Toolbox Newsletter provides product reviews, training thoughts, political thoughts and anecdotal tidbits about shooting, self-defense and current Toolbox community events.

In this issue:

***Concealed Carry Options: Part 2, On-Body Carry

Evaluating Concealed Carry Options: Part 2

In the first part, we covered the topic of evaluating concealed carry options, first discussing the threshold issues of: handgun size, climate, concessions in clothing/style, comfort vs. effective concealment, and issues related to carry methods.  In this second part, we will discuss the different on-body carry options and how they bear on the five threshold issues.  Part three will cover off body and special issues.

There are two general styles of carry with many options within each general category.  The two general categories are on-body and off-body.  On-body is where the handgun is more directly attached to the person, while off body means the handgun is concealed in a purse, fanny pack, backpack, box, etc.  The first category we will discuss will be on-body.  Links to pictures of each holster type are included in the text.

On Body Carry:

Within the on-body category are holsters that attach to belts/waistbands, shoulder holsters, ankle holsters, thigh holsters, underwear holsters, small of back, and belly band holsters.  Below, each type and the subtypes will discussed.  Advantages and disadvantages will be discussed in relation to the applicable threshold issues.

1.      Belt/waistband holsters:

There are two types of belt/waistband holsters: inside the waistband (IWB) and outside.  Each has generally two types of attachment methods available: clip on and belt loop.  So that makes for four different general types.

http://www.usgalco.com/ViewLargePic.asp?ProductSKU=RG212

Inside the waistband holsters secure the gun to the belt or clothing waistband with the gun barrel/slide inside the pants.  Carry position of inside the waistband holsters typically are strong side, behind the hip of the shooting hand.  While this is not universal and there is a growing cadre of shooters preferring to carry the gun up front near the centerline or belt buckle (called appendix carry), most concealed carry by this method is done behind the hip.  The stock of the gun is normally situated above the belt line such that the owner can grasp and draw the handgun.  Advantages of this method are that the gun barrel does not extend below covering garments (shirts, sweatshirts, coats).  This aids greatly in concealment.  Larger handguns are harder to conceal using this method, than smaller ones.  The most important dimension on the handgun is the grip/stock length as this is what generally gives the most trouble of printing (through the shirt or covering garment).  Disadvantages are generally comfort related as the width of the handgun can cause the pants to be very tight (they need to be tight enough to keep the pants up with the gun hanging from them).  Overall, this method is good in that the gun is very readily available, and is conducive to a relatively fast draw.

Outside the waistband holsters are generally known as “belt holsters”.  While a lot of belt holsters do not cause the handgun to ride high enough or close enough to the body to conceal, they also were generally not designed for concealment purposes.  These are more like hunting holsters and will really not be discussed at all here.  What will be discussed here are the different types of concealment belt holsters.

There are two types of attachment techniques for the outside the waistband holsters.  The first attaches directly to a belt (much preferred is a thick, strong leather belt).  The second is known as a paddle holster, so named because there is a paddle that extends down inside the pants and presses against the hip to secure the holster part that extends outside the pants.  Generally speaking, paddle types ( http://www.usgalco.com/ViewLargePic.asp?ProductSKU=M4X224 ) are much harder to conceal as they tend to not secure the handgun close enough to the body.  Their main use is by police and people who like to be able to take their gun off and put it on quickly throughout the many stages of their day (including bathroom breaks).  Advantages are quick setup, excellent retention and solid securing of the gun to the wearer.  Disadvantages are that the system is almost impossible to effectively conceal.

The concealment belt holster comes in several types.  Mainly there are three types: belt, slide, and pancake.  Belt style are very similar to regular belt holsters but are designed for high ride and low profile.  A lot of the best concealment belt holsters these days are made of a type of plastic named Kydex.  The material is very resistant to wear and allows for the fastest draw due to the securing method of the gun by its trigger guard.  A disadvantage to this system is that it must be concealed by a coat or windbreaker and tends to print much easier than IWB style carry.  Advantages are comfort and accessibility.

http://www.usgalco.com/ViewLargePic.asp?ProductSKU=M3X212

http://www.usgalco.com/ViewLargePic.asp?ProductSKU=JAK212

http://www.usgalco.com/ViewLargePic.asp?ProductSKU=CON212B

Slide and pancake holsters are very similar in that two pieces of holster material (usually leather or nylon) are sewed together with a non-sewed part left to sandwich the handgun.  Belt/slide holsters do not cover the barrel portion of the gun very far while the full pancake holsters pretty much cover the whole gun from just forward of the stock.  Both styles cover the trigger (for safety purposes).  Both styles keep the gun as close to the body as is possible and work to keep it high enough that some body types can conceal a handgun effectively using an untucked t-shirt or sweatshirt.  Advantages of this system are near maximum comfort, good availability/draw speed, and conditionally effective concealment.  The main disadvantage of this system is that it can limit your clothing options in order to maintain effective concealment.  Most problems will occur with the barrel peeking out from under the coat or sweater.

http://www.usgalco.com/ViewLargePic.asp?ProductSKU=TUC456

One type of holster not mentioned above is the inside the waistband tuckable type whereat the carrier’s shirt can be tucked in around the holster to hide the gun under a tucked in shirt.  This type of carry is cumbersome to draw from, but is fairly good for concealing smaller handguns (as well as medium compact sizes like the HK USP Compact and the compact 1911 variants).

2.    Shoulder holsters:

http://www.usgalco.com/ViewLargePic.asp?ProductSKU=40RIG

http://www.usgalco.com/ViewLargePic.asp?ProductSKU=VHS212

Shoulder holsters are a cross draw style (meaning the shooting hand reaches across the body to draw the gun) design that secures the gun under the arm and above the belt.  The vast majority of shoulder holsters are made of leather.  Some of them are made of nylon or a combination of nylon and kydex.

The system of hanging a handgun under the arm is a somewhat problematic concept solved by essentially a figure eight of leather that is worn with an arm through each loop of the eight.  The holster hangs either vertically or horizontally (depending upon the type of holster: horizontal or vertical) from the top of the eight, which lies under one arm.  Holders for magazines or speed loaders can be built into the other end of the eight under the opposite arm.  The crossroads of the eight lands square between the shoulder blades.

This concept works to hide a handgun under the drape of a medium loose fitting coat, including a suit coat or sports jacket.  It frees up the beltline of the carrier.  Advantages of this system are that it can conceal a smaller handgun very well in circumstances where any kind of waistband type holster would not work, that it is very comfortable, and that the gun can easily be drawn while sitting/riding in a car.  The disadvantage of this system is first, that concealment is not always effective when the jacket flies open due to wind or movements of the wearer.  Many a gun has been flashed to the unwary public due to the gun butt protruding out while the wearer was bending over.  Another disadvantage of the system is slow draw.  While the gun is almost universally available, the draw stroke requires the shooter to reach all the way across his body in a very obvious and lengthy motion.

3.    Ankle holsters:

http://www.usgalco.com/ViewLargePic.asp?ProductSKU=AG296

Attaching a gun to one’s ankle is also one of those systems requiring the overcoming of body mechanics.  It is hard to strap something as dense as a hunk of metal to one’s calf and not have gravity move it down into one’s shoe.  But thanks to science, designs exist that can hold a small sized handgun in place.  One of the main issues is that the choice of gun is very limited due to the size of the pant leg used to conceal the handgun.  The other main issue is slow draw and the position necessary to be assumed to put the hand in contact with the gun.  The ankle holster cannot be worn with shorts, etc. and the type of pants are also limited that will work with the system.  A lot of police and serious concealed carry persons do use ankle holsters for concealment of their back up gun.  Even though the gun is small and the draw is slow, their reasoning is that it is better to have a gun than none at all (in the event their primary is unavailable).

4.      Thigh holster:

http://www.usgalco.com/ViewLargePic.asp?ProductSKU=TBBK2

Thigh holsters are for women.  The concept is to have a double or single strap around the thigh with the holster attached to these with a garter style tether attached to the waist or belt to keep the whole rig from dropping around the ankle  They do work to conceal a small handgun for the women whose thighs don’t already touch each other.  There is a limited choice for this type of holster.  Obviously, the wardrobe choice would be limited for this carry concept, too.  Only dresses or skirts will work, and longer hemlines make the draw even slower or more difficult.  Advantages to this type of concealment method are good concealment, effective concealment (as in no one’s supposed to be looking there and no one’s going to discover it while hugging the carrier), works with some of the hardest garments to otherwise conceal a handgun.  Disadvantages are that the size of handgun is limited, few choices exist as to holster manufacturers and models, and the gun is slower to draw.  One other advantage is not tactically related, but if you are a woman looking to turn on your gun loving romantic interest, a thigh holster is the sexiest rig to use.

5.    Small of Back (S.O.B.):

http://www.usgalco.com/ViewLargePic.asp?ProductSKU=SOB212

http://www.usgalco.com/ViewLargePic.asp?ProductSKU=MOB212B

The small of back holster is technically a belt holster in that it attached to a belt, but the method/angle of carry is different enough to warrant a separate discussion.  With a SOB holster, the handgun is secured basically inline with the belt such that the muzzle is horizontal.  Another form of SOB carry is vertical like an IWB holster, but the position is basically in the small of the back, in between the wearer’s gluteus maximus cheeks.  Both require a different draw stroke and conceal somewhat differently than the IWB method.  The first major difference is in the accessibility of the handgun while seated.  The SOB method is not good for this and can be uncomfortable while sitting for long periods.  For some wearers, it really doesn’t seem to hurt them much.  The SOB carry is fairly easy to conceal while not bent over.  While bending over, if the concealing garment isn’t long enough or heavy enough, the gun will either be fully exposed or print badly.  Again, while not sitting, the method is also fairly comfortable, even if the wearer is carrying inside the waistband, generally due to the lack of flesh in the gap between the cheeks.

Generally, there are few advantages to the SOB carry unless the wearer is having issues with IWB or belt holster carry.  Some wearers merely just prefer the method.  One reason some rather experienced people carry in that method is due to the accessibility of the gun to both right and left hands.  The method conceals easily, but is harder to keep concealed while bending over and it is less secure from unwanted users.  The draw is slow and can be made fairly inaccessible by the type of seating employed (although IWB and belt holsters become hard to deal with under jackets pinned down by seatbelts, too).  Due to the comfort level, the outside the waistband version of this holster can be a popular choice.

6.    Belly Band:

http://www.usgalco.com/ViewLargePic.asp?ProductSKU=UWBKLG

The belly band holster is a strip of material that is generally a mesh synthetic which is adjustable using elastic and Velcro.  It secures a gun in pockets sewn into the material of the band.  This presses the gun fairly tightly/flat against the abdomen or back above the beltline.  On men, the belly band can stay fairly secure for all day carry, is comfortable and conceals a smaller handgun well, with larger handguns being concealed fairly effectively.  It is designed for hot weather carry under a t-shirt and allows the wearer to wear shorts which would not support a handgun.  Downsides of this method are speed of draw and overall security.  While it can be fairly fast, is probably not in the class of speed as regular belt holster or IWB.  It is very secure in a control sense (the wearer naturally denies people the access of touching him in that area of the abdomen), but the overall method can present problems of the whole band moving around under certain types of movement (running, jogging, wrestling).  It depends upon body type.  Some people will find it doesn’t work, while others may swear by it.

7.      Thunderwear:

http://www.thunderwear.com/images/comfort.jpg

I mention this one by name because it is so unique.  This method of carry resembles an athletic supporter, but is not actually secured between the legs.  It consists of an adjustable band with a double pocket section in the front made from soft fabric which hangs down from the band.  This setup is designed to secure a handgun below the waistline/beltline in the front/crotch.  The gun is accessed by either inserting the shooting hand into the pants or using the non-shooting hand to press up on the barrel to cause the grip of the gun to protrude up above the beltline.  It doesn’t require any specific form of pants/shorts with a strong belt because it doesn’t rely on the outer garment for support.  The method apparently is very effective concealment even though for men, other things are down there, too.  Thunderwear type holsters are very versatile and many men as well as women claim it is both comfortable and effectively conceals their handgun.  Your esteemed writer has not actually tried one of these and is working from hearsay from other users (as well as universal experience gained from 13 years carrying concealed).  Overall, while I am unwilling to say this is the best universal method for carry, there are a lot of good reviews on this.

Downsides to this design are speed of draw, potential comfort issues while sitting down, and potential limitations to the size of handgun permitted.  With the butt of the pistol below the beltline of the covering garment, it can be very hard to get a solid grip on the handgun quickly.  There may be issues of the barrel jamming itself into sensitive areas or flesh while sitting down.  Due to the aforementioned issue, the size of handgun may be limited to something smaller than the prospective carrier wants to use.  Upsides are the universality of the design.  It fits most garment types as well as most handgun designs.

8.      Appendix Carry:

http://www.onesourcetactical.com/index.asp?PageAction=VIEWPROD&ProdID=1970&HS=1

While appendix carry was briefly mentioned in passing above in the IWB section above, this method is also different enough to garner special mention.  AIWB (appendix, inside the waistband) is more prominently pushed by such individuals as Gabe Suarez at Suarez International.  The history of this type of concealed carry is probably the longest of any type.  Considering the garments and generation wearing them now are in near universal ridicule by the more vocal generation, it is understandable that different methods of IWB carry are now the norm.  The generation we make fun of because their pants are pulled up under their armpits is the one that used to carry a full sized Government Model Colt 1911 under nothing more than a thin suit coat with no issues of comfort, concealability, or accessibility.  The gun could be concealed simply by keeping the jacket buttoned.  Because the beltline is so high, it would not restrict bending over (even with five inch barreled handguns).  Due to the handgun being right up front, draw would be as unrestricted as possible for a concealed handgun.

Lowering the beltline and changing the wardrobe to less “formal” appearing attire makes this method of carry harder, more uncomfortable and relegates it to either short time periods of carry or to the extremely fit men who have enough time to tone their abs (and probably not even then to all fit men).

Commentary section:

In this day and age whereat old people are nearly universally ridiculed and the young are effectively put on pedestals suitable for worship, it is no wonder that a method of concealed carry which is probably the most superior method (with or without a holster!) ever devised has now fallen into nearly total disuse.  The beltlines keep dropping as well as the common sense.  Fashions today are just as incompatible with concealed carry as is their suitability for work or productivity.  I guess the following generations are going to have to reinvent things and discover that people 100 years ago indeed did know how to carry a gun.

Continued next issue: Part 3 Off-Body Carry Options!

Newsletter #2, November 14, 2009

Issue #2, November 14, 2009

The Tactical Toolbox Newsletter provides product reviews, training thoughts, political thoughts and anecdotal tidbits about shooting, self-defense and current Toolbox community events.

In this issue:

***More on tactical optics—magnifier options

***Black Friday Special

***Evaluating concealed carry options–part one

Tactical Optics – magnifiers revisited:

Above shown the LaRue Tactical mounts and Aimpoint Comp M2 w/ Aimpoint magnifier.

After some backlash over the stuff I said about magnifier options like the EoTech flip to the side magnifier and the Aimpoint setup, I will have to re-examine why I said the things I did.  A partial quote follows of some of the issues one alert reader had:

Ok, about the optics… I think you should give more of your “mission” to validate your opinion or to lend it more weight. I just got the impression it was a “everybody should do it this way” type of argument. Also. Have you ever used an aimpoint magnifier? Some of the things you comment on, I wonder if you’ve really used. No offense man, just saying how it comes across.

Also, it seems a bit like you have valid points, but for those 5% of scenarios. I would rather plan for the 95% of scenarios than the 5% personally. Maybe I’ll read it again and then comment on it for your review.

The alert reader has several points:

#1 it seemed I didn’t properly describe my mission.

My response:

If it wasn’t clear enough, the mission parameters I was reviewing for were general civilian defensive rifle usage.  This means taking one rifle to engage potential threats from zero to 250 yards.  But I did caveat for the reader’s individual needs, such as, “If you only are preparing to engage an enemy at 50 yards and under and rarely over 75 yards, a red dot optic might work best.”

#2 the reader got the impression I was making an “everyone should do it this way” argument

My response:

I thought I was clear enough in the article that I was contrasting the optical equipment with the mission.  If close range only, the red dot would work well.  It was my opinion/conclusion that the magnifiers were not worth the money or weight/stowage trouble.  Perhaps I was too harsh?

#3 have I ever used an Aimpoint magnifier?

My response:

I do not have an Aimpoint.  I opted for the Eotech because of the ruggedness of the system due to its holographic nature.  If any little piece of the window is left, even if it is struck by a bullet (now just think where the bullet might go after it passes through the window) or flying debris, the reticle will be visible in the left-over window shard.  I also liked the overall lower profile.  It is not that the Aimpoint is an inferior piece of equipment.  It is just that I liked the aforementioned features better than what the Aimpoint had to offer.

On to the more relevant answer, I have tested my own Eotech by putting a ten power binocular optic behind it.  The results were impressive (although trying to hold a binoc up to one’s eye and steady the rifle is a really fun thing to do).  However the results, they did not convince me to go ahead on a $600-$800 optic that only had four power magnification.  My experience with shooting the AR with an ACOG left me with desire for even more magnification and with that, variable magnification (2x to 7x).  This is not, at this time, available in flip to the side magnifiers.

#4 it seems I am preparing for 5% of scenarios:

My response:

Yes, I am preparing for 5% of scenarios.  It is the 0.5% badguy that makes your day really suck.  I carry a gun every day for that < 0.01% of days.  Considering that a civilian scenario involving rifles is likely to unfold slower than one involving pistols, it is reasonable to believe a threat will take cover and be attacking from it.  It is also reasonable to assume one attacking from cover would present a very small target, possibly half a head.  My reasoning concerns weighing the need for that scope in the < 5% of scenarios versus the utility loss in using that high powered capable optic at close ranges.  I personally find it not interfering in the utility enough to outweigh its utility.  This personal discovery was echoed during training in that a novice rifle and scope user was trained to shoot at close ranges and didn’t seem to suffer from being required to use 2.5x optics.  A little practice and he was fine.

Conclusions:

My main concerns about the flip to the side are its cumbersomeness, stowage issues, and cost versus its overall utility.  I shall discuss each concern below.

Concerning cumbersomeness, I refer specifically to the fact that when flipped to the side, the optic is sticking out from the rifle and therefore subject to two things: lack of streamlining such that it might catch on team members or environmental obstacles–or it might interfere with ambidextrous use of the rifle.  I say “might” because I have not personally used these optics.  I only know general principles and designed certain features of my own tactical sling based on my experience in deep brush.  It grabs everything that has a hole in it or sticks out.  This unit sticks out when flipped to the side.  When the unit sticks to one side, that makes me wonder about ambidextrous use of the rifle.  Maybe our alert reader could share with us his experience in this area.

Second I would refer to stowage of the optical unit (when removed from the rifle).  This is not always a problem, but in the civilian sense, he isn’t typically suited up for battle on a schedule.  The battle comes to him.  If the optic is needed but is stowed, he has to retrieve and attach it.  Second, when not in use, he has to have a place to stow it separate from the rifle.  This takes planning and more gear.  Grabbing just the rifle, one extra mag, and going is not as much the option.  Discussing the virtues of detach only versus flip to the side is outside the scope of this article.

When considering the overall cost of an Aimpoint or Eotech plus the $600 optic, the total cost is likely in excess of $1k.  This opens up a wide range of possibilities for the shooter who is trying to maximize the range spread of his rifle.  If he is not trying to maximize his range spread and his utilization of the optic is controlled and mission specific, his motivations obviously vary.  So, if he is required to, say, clear a building and then sit on its roof covering a battlefield in which ranges wouldn’t exceed 150 yards because he was backed up by a real precision rifle, the flip to the side magnifier is a good choice.  For more general usage a consumer might be much better suited with a variable riflescope (with lighted reticle) as I concluded in newsletter #1.

Concerning utility, my biggest issues are from experience in the 100 to 300 yard range.  I found that an 3x ACOG was ill suited to the task of what I felt was true confident precision at 100 yards and beyond.  Maybe I was incorrect, but that was my experience.  It might have also been the reticle because the 100-300 yard ranges are obscured by the chevron.  I still felt I couldn’t see well enough with the optic to define my target too well at 300.  My concern with this was that I was shooting at a fluorescent pink painted 5”x10” plate at 300 yards and I could hardly see it any better with the 3x optic than I could with the naked eye.  I am assuming my threats will not be painted fluorescent pink and will be at least as small if they are taking cover.  So, with the magnifiers maxing out at 4x not giving enough magnification/definition for targets in the 100-300 yard range, I would instead opt for a regular rifle scope having a higher high-end magnification.  Here, the utility of the scope is probably much better than the magnifier (given we’ve spent about the same money on the scope as the magnification combo).

Again, the downsides of the scope option are lack of co-witnessing BUIS (back up iron sights).  During a fight, a damaged optic is much more easily ignored with the magnifier option.  Removing the scope, even with a quick detach system, would take a hair longer than the FTS magnifiers would to just flip them to the side.  To me, these are not enough reason to go with the magnifiers in general use over the lighted reticle scope given its gain in precision usage of the AR platform.

Your mileage might vary.  But hey, if the magnifiers light your fire, let me order you one today.

Black Friday Special!

The Friday after Thanksgiving will be a special day.  The sale day will extend through the end of Saturday.  I am not sure if the prices are ever going to get lower on the items I’m putting up on special.  On some items, I won’t be making a dime.

Something special about Friday and Saturday will be free gourmet coffee and those special biscotti for which my classes are getting famous.  Drop by and get some!  You won’t regret it.

Rifles:

FNH Patrol Bolt Rifle, all black, detachable box magazine, .308 Win, 24 inch heavy barrel.  Comes with a 10 power Bushnell Elite 3200 mil-dot scope with quality steel tactical rings, mounted.

This rifle is a quality mid-level precision rifle system.  Topped with a solid scope like the Bushnell Elite 3200, it should get good precision performance out to 1,000 yards.  Scope is not in stock and must be ordered.

MSRP without scope:           $1,208

Sale with scope:                       $1,208

Sale without scope:               $875

Next Generation Arms Patriot Model M4 Carbine Clone: 16 inch M4 profile barrel, PWS muzzle brake/flash hider, A4 flat top with stand alone detachable A2 rear sight, six position collapsible stock, M4 handguards, A2 grip, standard military spec two stage trigger.

This is the last of the inexpensive Next Generation Arms rifles.  While they are no frills, they are internally just as solid as the current Next Generation $3,600 top of the line models.  This rifle is a far superior alternative to the Colt LE series rifles.  This price and value cannot be beat anywhere and the two Patriots I have are likely to be the last ones I will get in.

MSRP:                          $1,600

Sale price:                $1,225

Next Generation Arms Minuteman w/ Noveske 14.5” double chrome lined: the same features as the above Patriot plus the exclusive enidine system tuned just for Next Generation Arms, and a top of the line Noveske 14.5” double chrome lined machinegun barrel with permanently attached suppressor.

This barrel upgrade is capable of 3/4 MOA and is far superior to regular mil-spec or other barrels due to its ridiculously long life.  14 ½ inches means that it is as short and light as you can get without paying a $200 NFA tax for a short barreled rifle.  Again, these Minutemen are last year’s models and won’t be coming back.  This is a one of a kind due to the custom barrel.

MSRP:              $2,250

Sale Price:    $1,600

Bushmaster A3 heavy profile fluted carbine: Regular Bushmaster carbine but with a heavy profile barrel fluted for accuracy.  This model has the detachable carry handle, collapsible stock, all the standard features in addition to the fluted barrel.

MSRP:             $1,299

Sale Price:    $975

Also available:

Polish Tantal AK74, 5.45×39                                                                         $650 two in stock

Next Generation Arms JC382 Patrol, dark earth                                  $2152 MSRP

Next Generation Arms JC382 Advanced Tactical, tactical grey    $2339 MSRP

Pistols:

All pistols in stock will be $20-$100 off marked price.  For women, all pistols come with a free hour of safety instruction.

Magazines:

Rifle:

All AR15 rifle mags in stock will be on special Black Friday Weekend Only:

Cproducts 30rd Aluminum, Magpul follower                   $9 ea.

Lancer L5 30rd                                                                              $16 ea. @ Cost!

Magpul window gen 1, black and foliage green                 $15 ea.

Magpul gen 1 foliage green                                                        $14 ea.

Magpul new gen window, green, black, dark earth         $18 ea.

Magpul new gen 20rd                                                                  $16 ea.

Pistol mags:

All pistol mags will be $2-$5 off.  Check in for availability and pricing.  We have tons of XD and hard to find Steyr mags as well as some Kel Tec.  Glock 22 and 23 mags available.  Some CZ and HK mags.  Many misc. and hard to find magazines in stock, too.

Evaluating Concealed Carry Options, Part One, Threshold Issues:

This is going to be a multi-part series concerning the issues surrounding concealed carry methods.

Just one step into the section of a gun store that contains holsters or onto the internet home page of a holster manufacturer is enough to apprise the shopper there are myriad options available for concealed carry of a handgun.  Online, whole sections are dedicated to confusing acronyms and holster names such as IWB, pancake, paddle, and fanny pack.  To a new shooter or someone uninitiated to these things, a confusing array of delicious boating apparel is not what he or she was expecting to see.  In the actual store, everything might look so foreign to the shopper that he or she can’t figure out how such contraptions might be used to secure a handgun or to what part of the body it might be attached.  The reason for this article is to give an overview of some methods of carry and their advantages and disadvantages.

The purpose for all those holster designs is that people come in all different shapes and sizes and their carry needs vary almost as greatly.  A method that works for a large individual might not work for a slighter one.  Conversely, we fat folk cannot always utilize methods used successfully (or more pointedly less painfully) by the slighter folk.  The differences in people run across the gender line, too in that women are not proportioned the same as men.  Carry options for men don’t always work for women.  Exacerbating this overall problem is the carry needs issue.  Some feel the need for larger handguns; others live in very hot climates.

Because the nature of an object is that it is separate from its owner, some manner of stowing it on the person necessitates a system.  This means a gun is not natural to keep with you.  You weren’t built with holsters or pockets on your body.  Everything is a compromise.  This article contrasts the compromises.

N3-thugPictures courtesy of Galco.

Threshold Issues:

When looking to conceal your handgun, several questions need to be answered first:

#1 Overall, how big of a handgun is sufficient to make me comfortable in defensive use?

#2 In what type of climate is it going to be concealed?

#3 What concessions am I willing to make concerning clothing options?

#4 Comfort vs. concealed effectively?

#5 Am I willing to deal with the issues arising from my chosen method of carry?

1. Overall, how big of a handgun is sufficient to make me comfortable in defensive use?

I am first assuming the reader has gone through the appropriate hoops to obtain the proper permission to carry a handgun concealed in their jurisdiction and otherwise follows all relevant laws.  Either that or a reader is contemplating concealed carry and wants more information on the subject and is thus, reading this article.

This issue is a large one and bears on the method of carry as much as almost anything else.  The larger the handgun, the fewer places to hid it effectively.  Factors a prospective gun packer (PGP) will have to contrast will include the caliber selection (in my book 9mm Lugar is the minimum), frame size and barrel length, shootability/utility, shooting comfort, and ammunition capacity versus the practicality of actually carrying it.  The first rule of gunfighting is to have a gun.  The second rule might be to carry a big enough gun.  It has to be powerful enough and accurate enough to be effective.  But too much power usually means size or controllability issues.  This means too much recoil to control the gun or the gun is just too darned large to pack around.

Mainly what I am arguing against are guns just too small to do any good as a primary defensive handgun.  A good question to ask yourself is, “If I knew there was going to be trouble and had to pick a handgun, what would it be?”  If the answer to this is within reason, then we can start looking for a concealment option.  If the concealment options aren’t favorable for this, a different choice would be best.  If my first choice is too big, I usually opt for a shorter barrel and/or grip length, while retaining the same action type (revolver or pistol) and caliber as the original (as long as the original wasn’t A. a Desert Eagle .50 AE, or B. a magnum revolver of .41 cal or larger).  This cut-down usually makes the concealed carry option more palatable.

2. In what type of climate is it going to be concealed?

The climate makes a large difference on what is carried where.  As a general rule, less clothing necessitated by warmer climes is detrimental to concealment.  Some handguns combined with some body types make for a nearly impossible combination for concealment in hot weather.  When I lived in Oregon, it almost never got so hot I sweated too badly.  When I lived in Kentucky, it was so hot and humid in the summer, I sweated so badly I dared not carry my beloved Kimber 1911 .45s.  They would most assuredly have rusted to uselessness.  I instead carried an HK as it didn’t have rust issues (and it wasn’t nearly as beloved).  However, because the HK didn’t conceal well under a t-shirt, I had to opt for a fanny pack method.

3. What concessions am I willing to make concerning clothing options?

A person who does not carry a pistol concealed dresses according to style or likes and dislikes based on factors that didn’t involve carrying a pistol under his/her clothing.  When starting to carry concealed, you may have to adjust your wardrobe.  The latest fashions were likely not designed with carrying a pistol in mind.  Now, some of my readers might have already been perusing the 5.11 tactical store.  Some might think that fashion will have to be tossed out the window entirely and we’ll all be walking around in khaki colored fishing vests and modified BDU’s looking like out of place fly fishermen.  This is just not so.  There are a lot of options and holsters designed with the suit wearing office worker in mind as well as the knit polo shirt wearing blue collar worker.

However, the fact remains, your concealed carry method may be modified by how far you’re willing to change your fashions.  Is it worth it to look a little fatter in order to carry your pistol with you?

4. Comfort vs. concealed effectively?

STOW_NGO

Sometimes it is somewhat uncomfortable to be carrying your favorite blaster in certain spots.  The most complained about concealment options are, in order, appendix (AIWB) and inside-the-waistband (IWB).  Both methods place the handgun inside a holster (hopefully) which is located inside the pants of the PGP.  Appendix carry has the gun up front usually just to the right of the belt buckle.  IWB might be in one of several different locations, which include behind the right hip, in front of the left hip, or just right in the middle of the back.  Normally people tighten their belts to hold their pants secure.  There is usually not a lot of extra room in there.  As typical Americans, maybe there is a little less extra room in there.  This usually translates into pain and suffering.  What might be the conundrum?  The conundrum is that both the appendix and IWB carry methods are fast and more secure than others.  A lot of the time, the real question for men is, how much pain is too much?  For a lot of women, their bodies are not conducive to right hip IWB and appendix carry doesn’t fit their wardrobes.

Other issues concerning comfort are the weight of the pistol or revolver in a pocket in a jacket pulling on the PGP’s neck.  The comfort issues there are mainly related to weight/size of the gun, rather than location.

5. Am I willing to deal with the issues arising from my chosen method of carry?

Bending over.  Some carry methods either restrict or prohibit this: the butt of the handgun sticks out or outright slips out from under the clothing or the barrel of the pistol is pointed at the PGP’s groin such that bending over becomes painful.  The PGP is saying to himself, “Satan himself designed this thing because the father of all lies talked me into buying it!”  Purses and off-body styles of carry put the gun at risk of being lost through forgetfulness or theft.  Bathrooms are harder to visit with some carry methods than others.  Where do you put the danged gun?  It’s not like they designed those stalls with PGP’s in mind.  Each carry method needs to be fully understood how the PGP is going to deal with the issues that particular method creates.  No method is going to be perfect for all situations.

Continued next issue: Part 2 Carry Options!

This letter brought to you courtesy of The Tactical Toolbox.

Visit us on the web, www.thetacticaltoobox.com

Newsletter #1, October 31, 2009

Issue #1, October 31, 2009

The Tactical Toolbox Newsletter provides product reviews, training thoughts, political thoughts and anecdotal tidbits about shooting, self-defense and current Toolbox community events.

Training Update:

Basic Carbine Operations #1 – Rainout!

Basic Carbine Operations 1, held October 17th, was a rainout event.  Apparently any pictures taken of this event were lost due to iPhone sogginess.  The day started well at almost 8 AM with no rain, but the ever present threat of such.  A light rain started during the base zero stage.  By the time the class started it was drizzling steadily.  This class showed the promise of making real men out of the participants.  At the end of section one, Rifle Shooting Positions: Accuracy, the rain was pretty steady.  Later it became so hard that water soaked down through my legs and filled up my hikers.  After that, my shoes squished when I walked.  It would have been alright until the wind started to blow and the shelter I set up to protect the paper target supplies wasn’t doing so well.  We had to remove the supplies from the area, stow them in the heated support shack, and take the cover off the shelter.  The new 10-8 Tactical training targets worked ok, even on the wet target backer boards until the wind picked up and chose select times to blow the target off the board.  At least twice, shooters were lining up on target for the next stage of practice when the wind would pick up and rip the target from the board.  At this point, I declared a ceasefire so we could re-evaluate training this day.

The shooters were real champs and desired to continue at least until two or three in the afternoon.  So, we made a course change.  Shooting bowling pins in the now constant heavy rain, we continued through combat shooting positions, ambidextrous shooting, and shooting on the move.  After a lunch which included sitting close to heaters to stave off the chill, we again took to the range for more instruction and a hasty final grade testing process, adapted for the bowling pins.  At this point, rain had tapered off a little and the wind continued to gust, enough to blow over my heavy main targets.  The testing process worked out fairly well as the shooters had to get some “teaching to the test” instruction prior to some test objectives.  Soon the rain had stopped enough to set up targets again so we could resume some more sections of the course (shortened of course for the time constraints).

One section we covered was rapid fire.  Rapid fire is necessary due to the anemic nature of some of our carbine’s cartridge and barrel length combinations.  What is taught is to be able to rapid fire rounds into a target at 5, 10, and 20 yards as fast as the shooter can pull the trigger.  Each shot is aimed, if possible.  The Next Generation Arms rifles carried by our shop are excessively good for this objective.  Both shooters could keep most if not all their bullets inside a 7” circle at 15 and 20 yards in bursts of two to ten or more rounds.  One shooter was using a Leupold Mark 4 2.5x-8x tactical scope and was not prior familiar with shooting a scope.  He was still able to rapid fire shoot and even excelled at it, zippering a five or so inch group with all the impacts vertically strung in a cool line up the target’s torso.  This was exactly what I liked to see.  Very impressive.  I wish I had pictures.

Overall the students were happy with their experience and, due to the shortened class and rainout, are invited back at a much reduced rate for the second half of Basic Carbine Operations 1 (now a two day, 16 hour course).

Now Available!

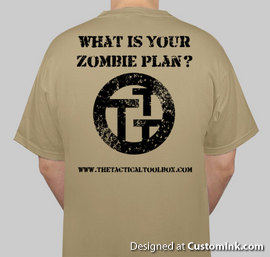
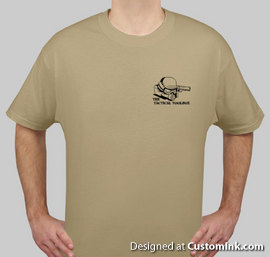
Tactical Toolbox EXCLUSIVE! – “WHAT IS YOUR ZOMBIE PLAN?” T-shirts

image005

Available in sizes, S, M, L, XL and 2XL.  Hurry, your size might move fast.  Limited supplies!  $12.00 ea.  Hanes Beefy-T shirt.  Turn inside out for washing.image003

Don’t be without your zombie plan t-shirt!  Be the first on your block to get this stylish shirt!

Training, it works!

Varmint Update

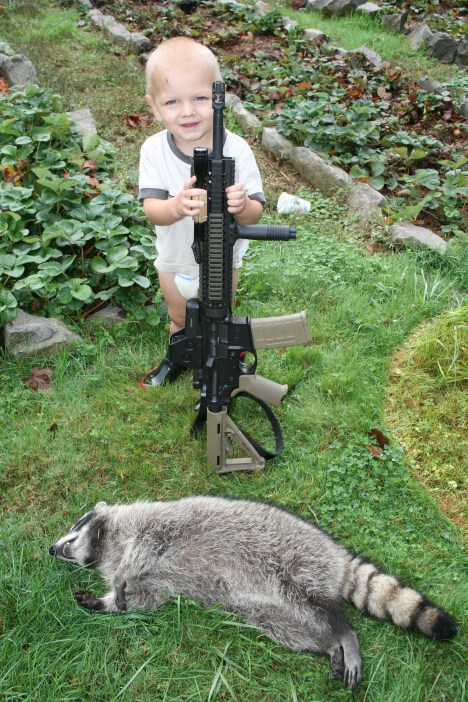
Last night, the dogs started barking.  Actually, it was this morning at 2:30 AM.  By the time I got out there, ten minutes had passed.  It helps if you wake up on your own instead of after your wife investigates by opening a window, then has to wake you.  So, when I got outside with my uber-cool tactical rifle and flashlight combo, I had to search around to see what was causing the dogs to bark.  I soon found eyes out in the pasture or up in a tree.  By the time I had determined those weren’t goat eyes looking back at me, whoever owned those eyes had rounded the other side of the tree in which it was perched.  Outside, alone at two in the morning, those glowing eyes are kind of creepy.  If hadn’t had so much experience with this kind of thing, my blood might have been pumping a little harder.

After determining that this was a varmint (still unidentified), I moved to a different location to get a better bead on the critter.  This brought me down to the edge of the pasture.  There I got a good enough glimpse of the thing to determine it was a giant raccoon and not a cougar.  Not that it mattered too much in determining whether I would let him have it.  My angle on him was good enough, but he kept looking away from the light.  So, I had to do a body shot.  The thing that bothered me was how I couldn’t see much of his body because the EoTech was too bright and the circle covered up enough so I had to gauge my shot based on where his rump was.  I took the shot and down he came, about thirty feet down.  I saw him squirming on the ground and called it good.  I was using handloaded Sierra 60 HP loads, my regular defensive stuff.

There were two things I noted from this experience.  Number one: NGA rifle muzzle brakes are LOUD!  I need one or two things for this kind of thing—electronic ear muffs and/or a silencer.  My folks even woke up and heard the shot.  Number two: my training from the week before paid off in a clean shot, good trigger control, etc. despite the conditions and my lack of ear protection.

Sale Items!

New for 2009 – Beta:

image007

The new Tactical Toolbox 3 point sling is now available in a beta version for $42.  It comes with a stainless snapshackle which can be traded in for a oxide black one when available.  Students in the Basic Carbine Operations course can attest that this sling is THE SOLUTION to all sling problems.  It starts out as a regular 3 point sling except that the carry is much higher and more in control than other 3 point slings.  When needed, it can be instantly converted to a single point sling for ambidextrous use.  No other sling is as simple, nor converts as fast.  It easily adjusts to every body type as well as is modular to adapt to different styles of sling attachment points.

Buy it now!  Only $42.00 for the world’s finest sling design!

Email me at tacticaltoolbox@yahoo.com to find out about magazines on sale!

GI AR15/M16 30 round aluminum magazines with orange or gray Magpul 3rd generation followers on sale!  $9.50 ea. These are blowout prices!

Thoughts:

Tactical Optics for your carbine:

Concerning my personal rifles, a lot of thought has gone into what kind of optic really improves a rifle’s performance over the iron sights and is useful for the purposes a rifle is likely to be put to use.  I have investigated at length the zero magnification electronic optics, scopes, magnifiers, etc.  Here are my thoughts on each.  Take it for what it’s worth.

Red dot sights:

image009Red dot sights such as Aimpoint, EoTech, ProPoint, Fastfire, Trijicon, all have similar features and some dissimilar shortcomings.  Their similar features are that they are typically smaller than regular magnifying riflescopes and lighter.  They have zero magnification optics which can facilitate the use of flip up iron sights through the visual field of the optics.  Almost all of them require batteries.  Some fit regular scope caps for water intrusion; others require something special while the Trijicon and Burris Fastfire don’t seem to have any caps to seal out water.
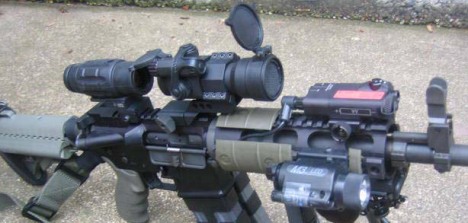
These sights are good for closer ranges and larger target sizes than are riflescopes.  Conversely, less precise aiming is possible with them.  It’s hard to beat a zero magnification optic at six feet!  But, if you’re into occasionally popping a varmint at 50-100 yards, you’re on less certain ground.  You’re on even more uncertain ground if you encounter an enemy who is peeking around a corner and presenting you with half a head shot at 50-100 yards.  If, for some reason your batteries fail or your electronic optic just outright burns out, you can always immediately flip up the irons and go to town.  This feature cannot be duplicated using a riflescope.

My experience is, when your rifle prints ½ to 1 ½ MOA, why use a zero magnification optic, especially if your potential range requirement might exceed 200 yards?  Many a time I’ve wanted more power, whether popping a steel plate at 300 yards or engaging a deadly squirrel nemesis at 50 yards or more.  Less and less am I impressed with the EoTech I have for anything other than a dedicated close range rifle.

Riflescopes:

image011

A lot of people might scoff at the idea of a riflescope on a CQB rifle.  What I have found is, I look for a lower powered optic with a zoom capability that would render it useful at 50-300 yards for head sized targets.  If the rifle can do it, I can see to do it.  This lower powered optic can be as low as 1x or 2.5x and still range up to 4x and 8x.  Recently, a student purchased a Leupold Mark 4 2.5x-8x illuminated reticle optic for use in the Basic Carbine course.  This ended up working well and he used the illuminated part pretty much the whole day.  We found that aimed shots at 5 and 10 yards were still quick and possible.  I found that the illuminated part of the reticle very useful and comparable in close range usefulness to zero magnification optics.  The key is teaching both eyes open techniques.  Not only can it be done, but it is essential to true ambidextrous use of combat arms.  With a rifle scope and illuminated reticle, flipping down the front scope cap allows your right eye to superimpose the lighted image onto the primary image the left eye is giving.  This allows very good close range aiming.

The downsides to riflescopes are that they do not work with irons unless the scope is entirely removed, they tend to be heavier/bulkier than the red dot optics, and they’re slightly more difficult to get used to both eyes open techniques.  The upsides are precise aiming at extended distances and thereby a greater effective range for the rifle.  My personal opinion is, for a general purpose combat rifle, riflescopes are the way to go, especially the Leupold Mark 4.

Magnifiers:

image013

Magnifiers are the response to the “need” for magnification without losing the close range capabilities of a zero magnification optic.  They generally work in either a flip-to-the-side mount or in a quick detach mount.  They typically are in 3x or 4x.  They do allow for use of the rifle in both a magnified mode and true zero magnification.

However, there is a problem with the concept.  The problem is two fold.  First, maxing out at 3x is hardly worth the extra weight and 4x is again hardly worth it, especially when the dot size doesn’t get smaller, but rather larger.  You aren’t going to be aiming more precisely.  Second, the whole fix is rather Rube Goldberg-ish in that the setup is cumbersome, more so than a single riflescope, and then leaves you with either an extra part to stow, or with a giant weight hanging on your rifle which isn’t doing your ambidextrous close quarters combat any good.  From my investigation, I decided against such an idea due to the above factors.

Conclusion:

If you are looking for a dedicated 0-50 yard rifle, a zero magnification optic is probably the choice, if you don’t just opt for straight irons.  If you are looking for a general purpose 0-300+ yard rifle, one of the low power variables should be your choice.  I would recommend against the magnifiers.

This letter brought to you courtesy of The Tactical Toolbox.

Visit us on the web, www.thetacticaltoobox.com